Test in the SDK
Welcome to this introduction to Testing in the SDK!
This tutorial covers the following topics
- REPL Overview
- Built-in Functions
- Load Environment Data
- Note on Transactions
- Load Pact File
- Call Functions
- Run REPL file
- Built-in Error Messages
In this tutorial, you will learn the basics of testing in the SDK to build your own REPL file. This is a great start to begin testing the smart contracts you build locally.
Key Takeaway
Pact and the Atom SDK provide a powerful testing environment that allows you to build and test Pact programs locally.
Testing Pact Code in the SDK Tutorial
Subscribe to our YouTube channel to access the latest Pact tutorials.
Pre-requisites
Before starting this tutorial, it helps to have completed the following pre-requisites.
-
[Pact Development on Atom SDK]/learn-pact/beginner/atom-sdk) : The SDK is required for testing in the SDK. You can get up and running with the SDK using this tutorial.
-
Project: Loans : You will be building a REPL file for the Loans project covered in a separate tutorial. This isn’t required but is a helpful way to better understand the smart contract used throughout this tutorial.
REPL Overview
REPL files are used to load and run Pact files using the SDK.
REPL stands for read - eval - print - loop. This acronym refers to the idea that given a Pact file, a REPL file is responsible for reading, evaluating, printing, and looping through the code as needed to both run and provide the output of the Pact file.
These are a common part of LISP-like languages such as Pact and they allow you to quickly test the smart contracts you build.
A simple way to load a REPL file is from your terminal as shown below.
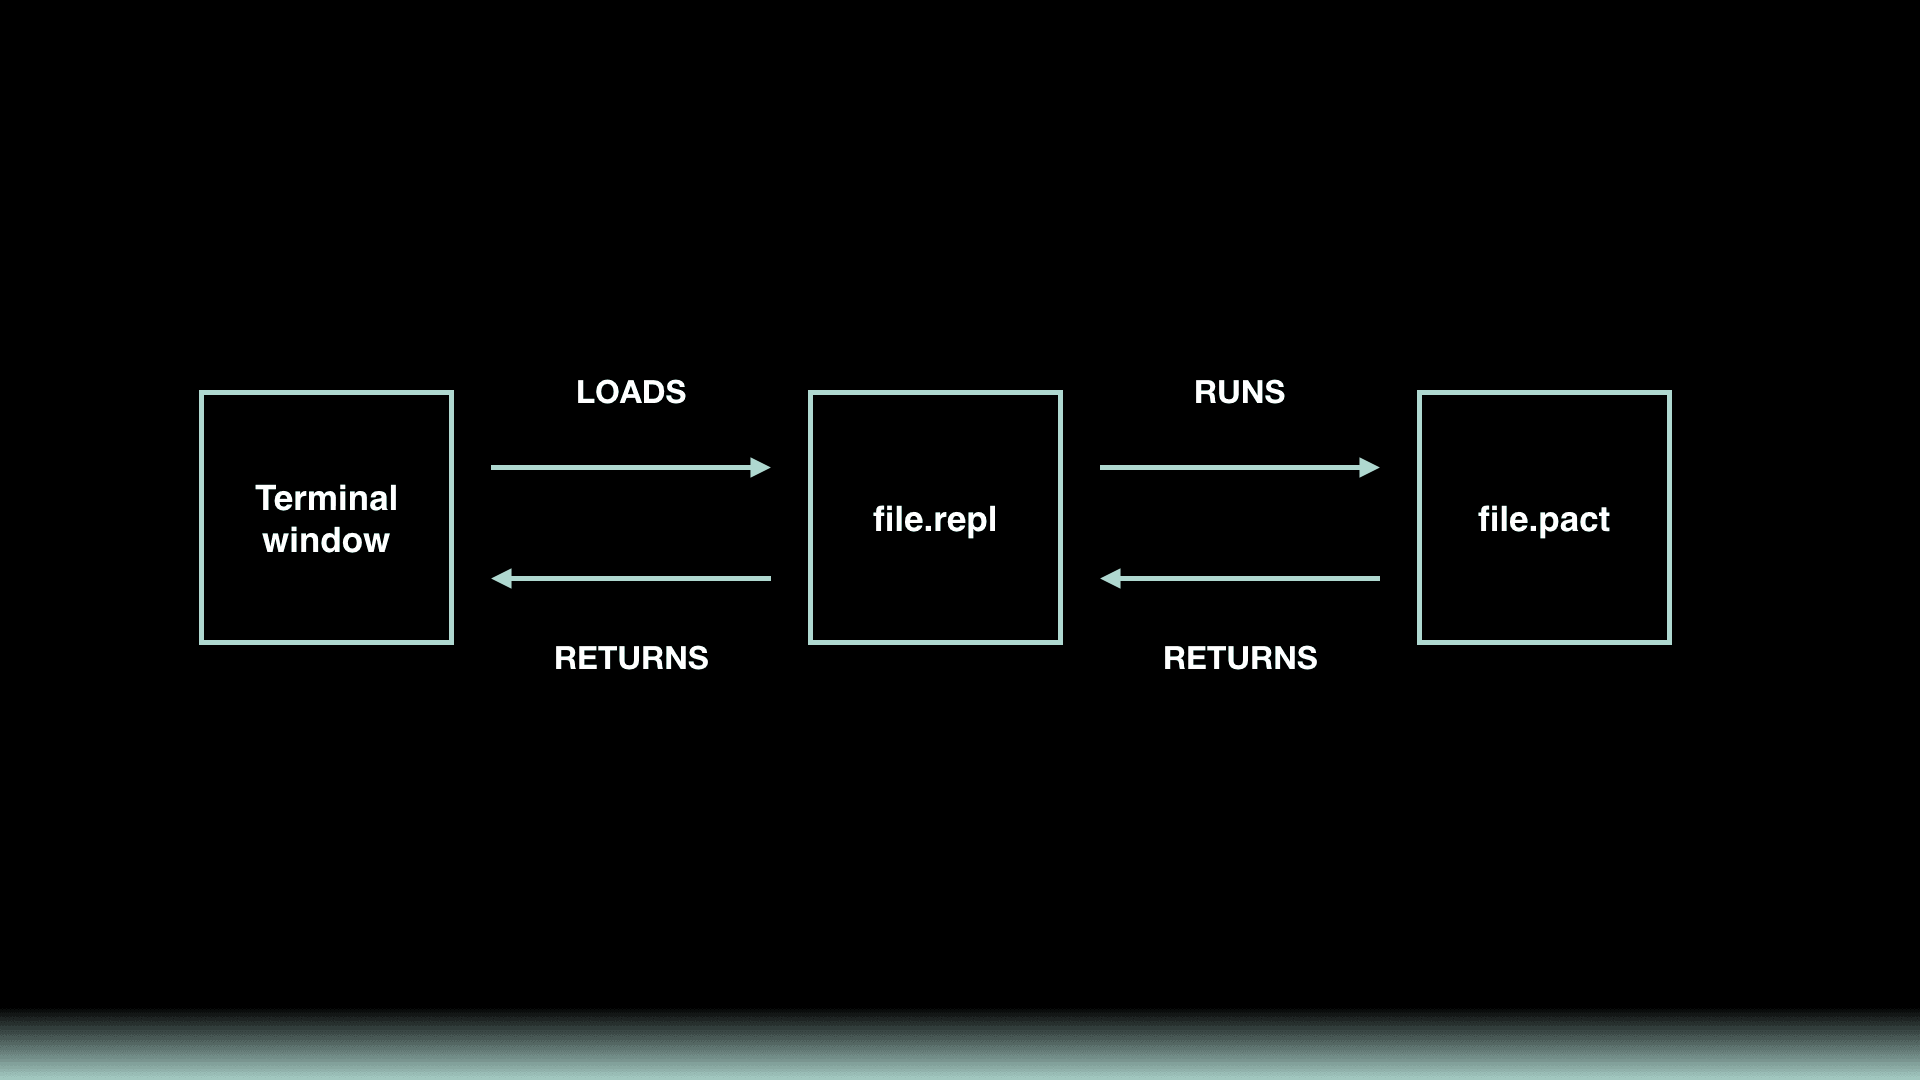
Using your terminal window, you will load the REPL file. This includes code that both loads and runs the pact file. The pact file then returns data to the REPL file which sends the output to your terminal window.
Comparison to Online Editor
To better grasp the importance of the REPL file, it helps to look at a tool you may be more familiar with - the online editor.
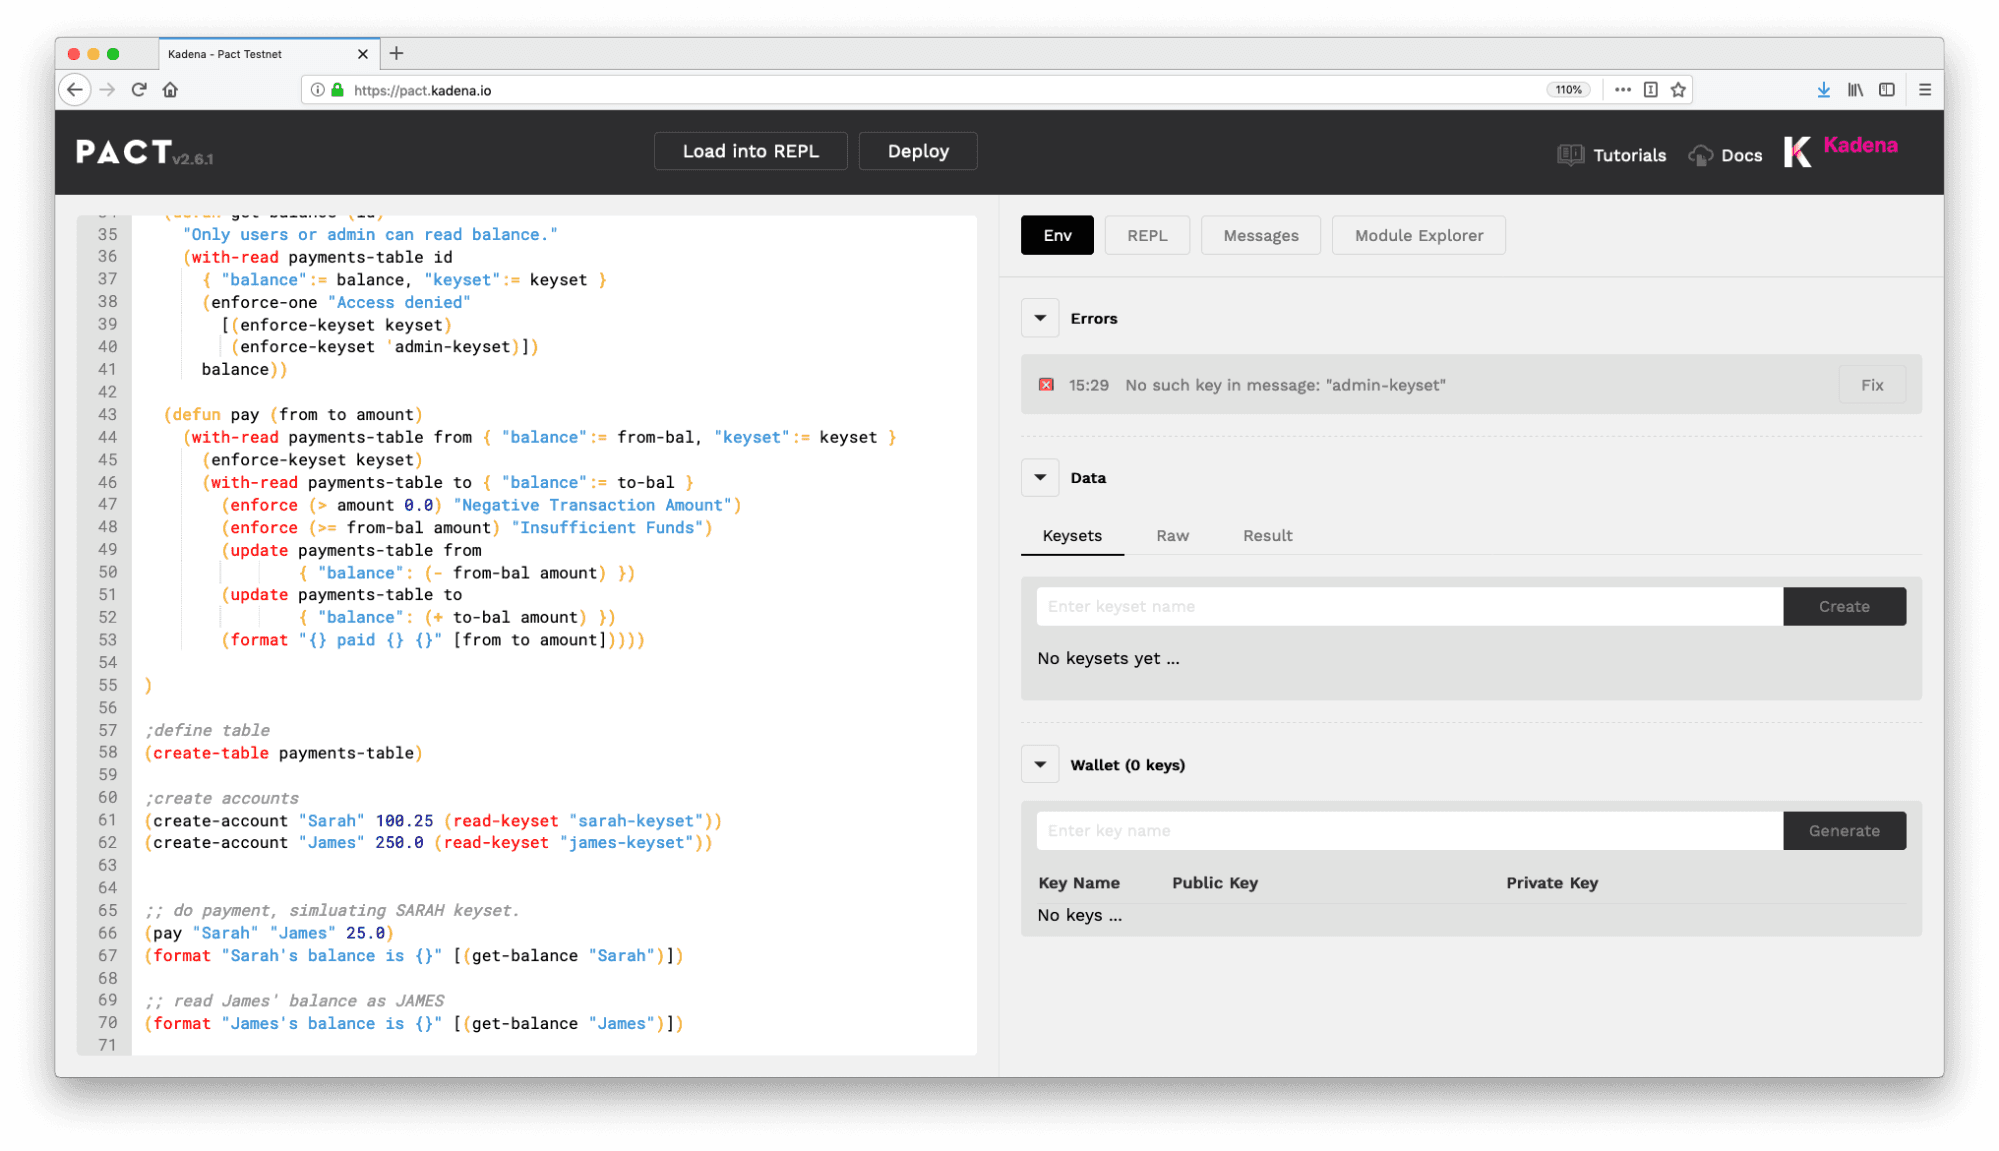
Many features provided by the online editor’s UI are things that you will need to code for yourself in a local or production environment. Things like loading the pact file into the REPL, setting up the environment data and keys, and making function calls will all be done from within the REPL file.
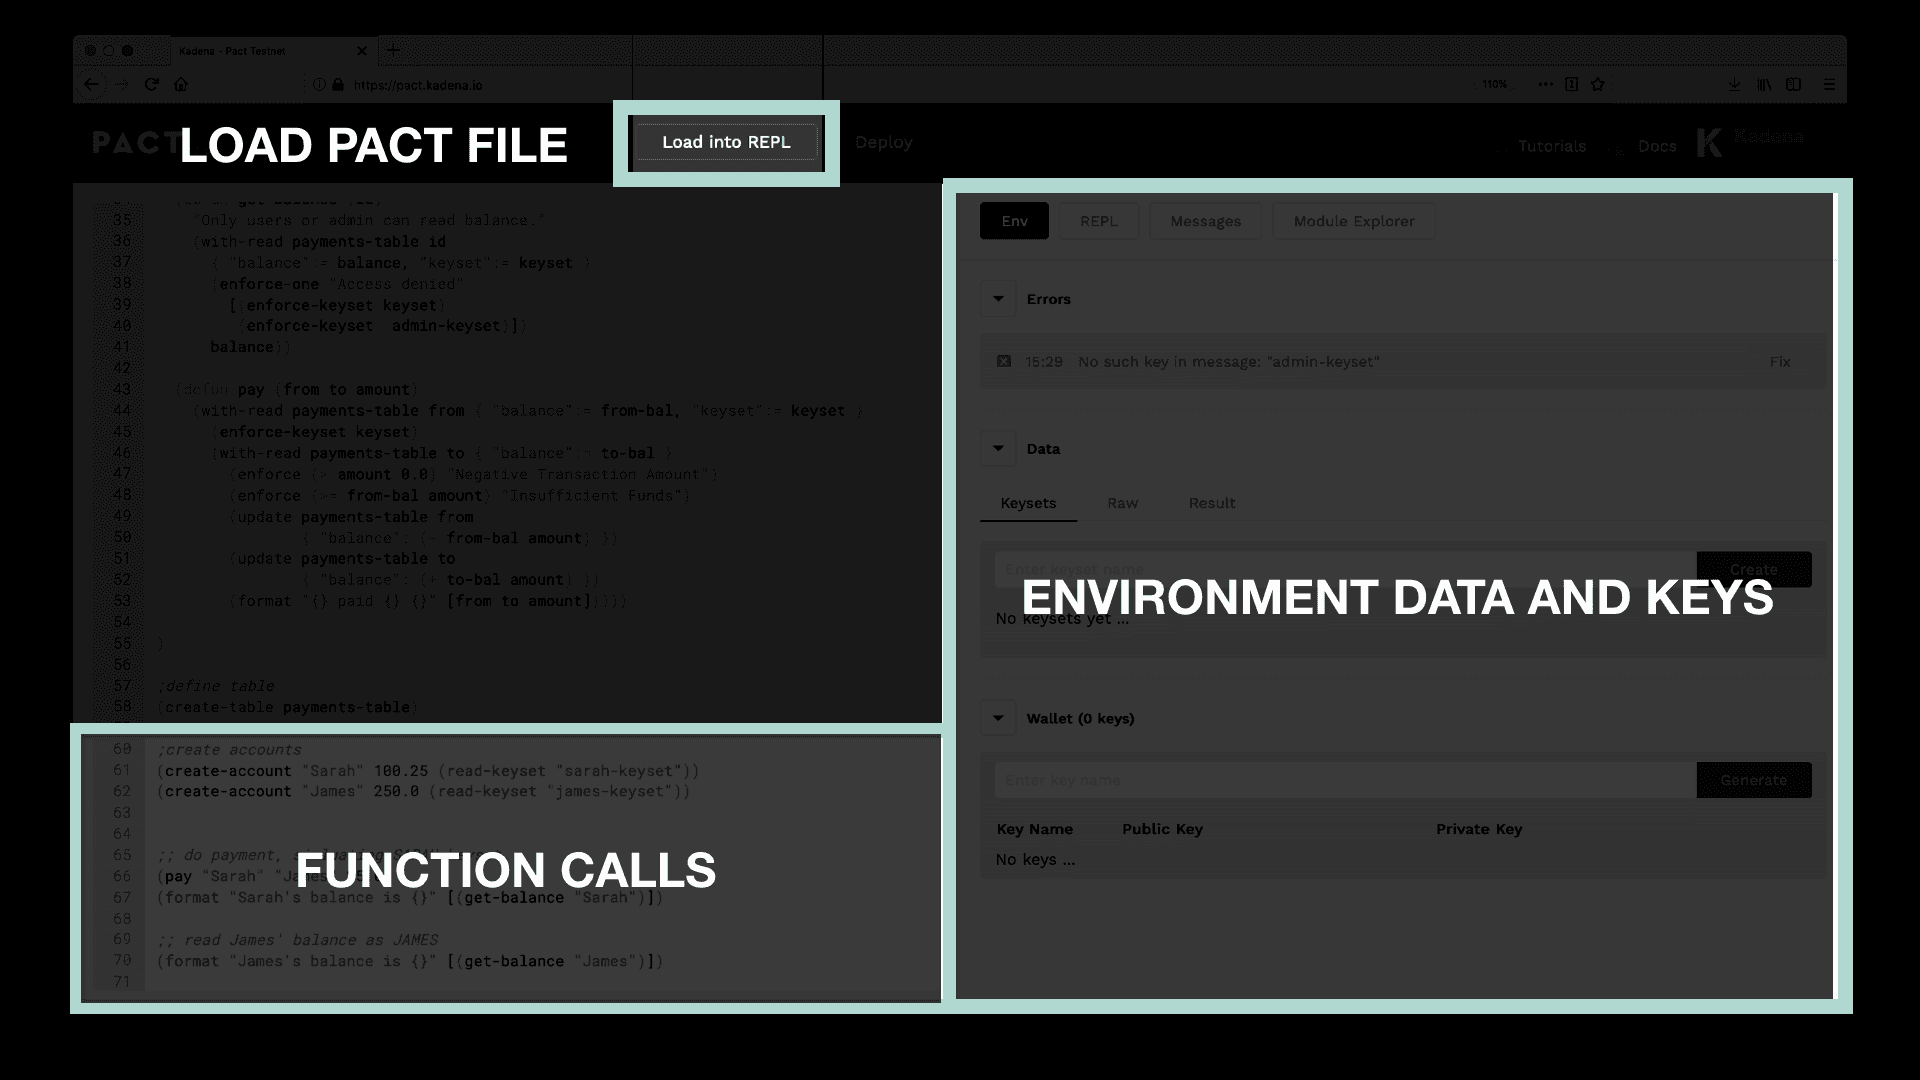
You will complete all of this and other important testing features using the Pact REPL only built-in functions.
Built-in Functions
When building a REPL file, there are many built-in functions available to you.
These functions are known as the REPL only functions because they cannot be used in pact files. While all of these built-in functions are valuable, there are some that are more commonly used.
Take some time now to review each of the functions in the documentation as well as the summary of commonly used functions provided below.
| function | purpose |
|---|---|
| begin-tx | Begin a transaction. |
| commit-tx | Commit a transaction. |
| env-data | Set transaction data. |
| env-keys | Set transaction signature keys. |
| expect | Evaluate expression and verify that it equals what is expected. |
| load | Load and evaluate a file. |
Coming up, you will create a .REPL file for yourself that uses many of the functions listed above.
Project Environment Setup
Throughout the rest of this tutorial, you will build a REPL file for yourself.
To follow along from your local environment, clone the repo pact-lang.org-code GitHub repo.
git clone https://github.com/kadena-io/pact-lang.org-code.gitgit clone https://github.com/kadena-io/pact-lang.org-code.gitChange into the test-in-sdk directory to begin working on this project.
cd pact-lang.org-code/test-in-sdkcd pact-lang.org-code/test-in-sdkOpen this directory in atom to see each of the files provided.
atom .atom .As you’ll see, there are a few separate folders available to you.
| start | Provides a starting point with all comments for every challenge. |
| challenges | Challenges in the demo are broken out into separate files, allowing you to build your application over time while having the flexibility to experiment with your own ideas. |
| finish | Includes all comments and code for the final application. |
| loans | Includes final application without the challenge comments. |
Each of these options are meant to help support you as you work through these challenges. Feel free to use them however you’d like.
1. Load Environment Data
The first step in creating a .repl file is to load the environment keys and data.
This is similar to what you have seen in the online editor. Rather than creating this data from the UI like you did before, you now need to program this information into your .repl file.
The online editor allowed you to create keys and keysets using the tool panel as shown below. The result tab shows data similar to what you will be writing into your .repl file.
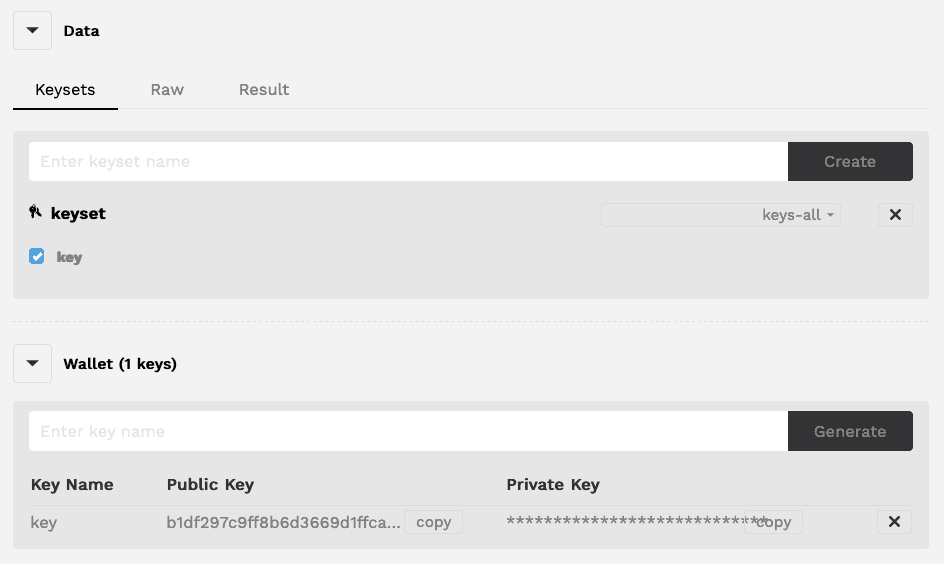
You can view the code that represents your keys and keysets using the Result tab.
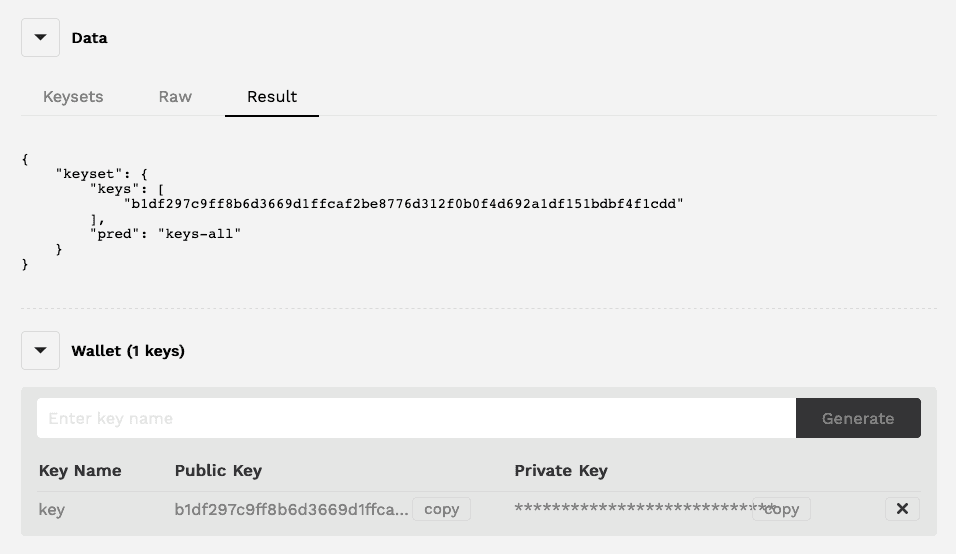
To set up this environment using the .repl file, you will use two separate built in functions; env-keys and env-data.
| function | purpose |
|---|---|
| env-keys | Set transaction signature keys. |
| env-data | Set transaction JSON data, either as encoded string, or as pact types coerced to JSON. |
env-keys example
(env-keys ["my-key" "admin-key"]) "Setting transaction keys"(env-keys ["my-key" "admin-key"]) "Setting transaction keys"env-data example
(env-data { "keyset": { "keys": ["my-key" "admin-key"], "pred": "keys-any" } })"Setting transaction data"(env-data { "keyset": { "keys": ["my-key" "admin-key"], "pred": "keys-any" } })"Setting transaction data"Looking at the loans.pact file could be a helpful way to understand what you are trying to do in the loans.repl file. This file exists in the project directory under 3-finish.
Note About Transactions
Before moving on, there’s an important note to make about transactions.
When working within REPL files, you can make as many calls to the pact code
within a transaction as you like. Any command sent to the blockchain is a
transaction, but a command too can have multiple calls, for instance, defining a
module with module and creating its tables with create-table calls.
To successfully execute a transaction you need to both begin the transaction and commit the transaction. This is done using begin-tx and commit-tx.
It’s valuable to use these built-in functions to group calls into small transactions within your REPL file.
Here’s why this is useful.
Error Example
Any error that occurs in a transaction will cause it to roll back and fail to run.
While it's possible to place all of your calls within a single transaction, this isn’t a good habit to get into. This will make it difficult to tell where your file is failing and make it difficult to continue testing.
For that reason, be sure to break up your test files into smaller transactions.
(begin-tx);; This could fail and I would know where the problem is(commit-tx) (begin-tx);; This could fail and I would know where the problem is(commit-tx) (begin-tx);; This could fail and I would know where the problem is(commit-tx)(begin-tx);; This could fail and I would know where the problem is(commit-tx) (begin-tx);; This could fail and I would know where the problem is(commit-tx) (begin-tx);; This could fail and I would know where the problem is(commit-tx)Transactions can be grouped together however is most convenient for your testing. Try maintaining a logical order in your transactions for ease of maintenance and readability.
2. Load Pact File
Pact files are not run by your computer directly, they’re loaded into the .repl file and run from there. Now that you have loaded the environment data, you need to load the pact file into the .repl file.
This is done using the built-in load function.
| function | purpose |
|---|---|
| load | Load and evaluate FILE. |
The syntax for this is simple.
load example
(load "accounts.pact")(load "accounts.pact")All you need to do type load then specify the file path as a string. Pact and REPL files are generally kept in the same folder so you usually only need to specify the name of the pact file.
3. Call Functions
Now that the pact file is loaded into the REPL file, you are ready to start calling its functions.
To do this, specify the module name with use, then call the functions from within the module.
Function Call Example
(begin-tx)(use module-name)(function-name "input-1" "input-2")(commit-tx)(begin-tx)(use module-name)(function-name "input-1" "input-2")(commit-tx)3.1 Generate Data
For this code challenge, you will need to make calls to a few functions from the loans project. Here is a brief overview of each of the functions you will call.
| function | purpose |
|---|---|
| create-a-loan | Accepts parameters to add the appropriate information to each table |
| assign-a-loan | Assigns a loan to an entity. |
| sell-a-loan | Sell a loan and log details in the loan history table. |
Follow the links provided or view the loans.pact file for more details.
If you have not already completed the Project: Loans tutorial
, try working through this tutorial to build the entire Loans smart contract for yourself!
3.2. Read Loans
After calling functions used to create, assign, and sell a loan, you can now read some of the data that you created. Similar to before, you will be calling functions from the loans.pact file. Feel free to reference the previous challenge for guidance.
Here is a brief overview of the functions you will call in this challenge.
| function | purpose |
|---|---|
| read-loan-inventory | Reads all loans in the loan inventory table. |
| read-loans-with-status | Reads all loans with a specific status. |
Run REPL File
At this point you have completed the REPL file. Congratulations! The last step is to run the file from your terminal to view the output.
To do this, open your terminal and navigate to the 3-finish directory from your project folder.
cd 3-finishcd 3-finishRun pact.
pactpactLoan the loans.repl file
pact> (load "loans.repl")pact> (load "loans.repl")You should see an output to your terminal similar to the data shown below. Notice the flags similar to those that you’ve seen throughout the challenges. This is to help you see where the code you wrote is corresponding to the output in the terminal.
Take some time now to view the output and see how it aligns with the code you wrote in the REPL file.
;; ========================================================;; 1-load-environment-data;; ======================================================== "Loading loans.repl...""Setting transaction keys""Setting transaction data""""";; ========================================================;; 2-load-pact-file;; ======================================================== "Loading loans.pact...""Keyset defined""Loaded module \"loans\", hash \"552198d5bc3a6cf8e84919a1b0f8c5cc764f65455e8dc687e3b6680b225e2684801fbfd42d6c734f798e3e210a03d5c9d6100c74433e3e16428903c95292466e\"""TableCreated""TableCreated""TableCreated""""""""";; ========================================================;; 3-call-functions;; ======================================================== "Using \"loans\"""Write succeeded""Write succeeded""Write succeeded""Write succeeded""""""""" ;; ========================================================;; 4-read-loans;; ======================================================== "Using \"loans\""[{"inventory-key": "loanId-1:Capital One", "balance": 40000} {"inventory-key": "loanId-1:buyer1", "balance": 6000} {"inventory-key": "loanId-1:buyer2", "balance": 2000} {"inventory-key": "loanId-1:buyer3", "balance": 2000}][][{"entityName": "Capital One", "loanAmount": 50000, "loanName": "loan1", "status": "assigned"}]"""" ;; ========================================================;; 1-load-environment-data;; ======================================================== "Loading loans.repl...""Setting transaction keys""Setting transaction data""""";; ========================================================;; 2-load-pact-file;; ======================================================== "Loading loans.pact...""Keyset defined""Loaded module \"loans\", hash \"552198d5bc3a6cf8e84919a1b0f8c5cc764f65455e8dc687e3b6680b225e2684801fbfd42d6c734f798e3e210a03d5c9d6100c74433e3e16428903c95292466e\"""TableCreated""TableCreated""TableCreated""""""""";; ========================================================;; 3-call-functions;; ======================================================== "Using \"loans\"""Write succeeded""Write succeeded""Write succeeded""Write succeeded""""""""" ;; ========================================================;; 4-read-loans;; ======================================================== "Using \"loans\""[{"inventory-key": "loanId-1:Capital One", "balance": 40000} {"inventory-key": "loanId-1:buyer1", "balance": 6000} {"inventory-key": "loanId-1:buyer2", "balance": 2000} {"inventory-key": "loanId-1:buyer3", "balance": 2000}][][{"entityName": "Capital One", "loanAmount": 50000, "loanName": "loan1", "status": "assigned"}]"""" You can experiment with changing the .repl or .pact files to see how this changes the output in your terminal.
Built-in Error Messages
As you’ve seen, you can run REPL files from your terminal to test Pact code.
Another valuable feature in the SDK is that it actually runs these files for you without using the terminal. This helps you spot errors from directly within Atom. Two features that help you spot errors are the error highlighting and the error message.
| Error Highlighting | Shows up as red dot on line that includes error. REPL files with errors in them will have a red squiggly line under the file name. |
| Error Message | Gives details about the error source. |
These are both valuable ways to effectively test and debug your Pact code.
Pact Examples
To view these features take a look at our pact-examples repo.
Change into your pact-examples directory or clone this repo into your project folder if you have not set this project up before.
git clone https://github.com/kadena-io/pact-examples.gitgit clone https://github.com/kadena-io/pact-examples.gitChange into the pact-examples directory.
cd pact-examplescd pact-examplesOpen this directory in atom.
atom .atom .Here you will see many more examples of REPL files along with the smart contracts they are testing.
Navigate to atoz > keysets > keysets.repl to view one of these examples.
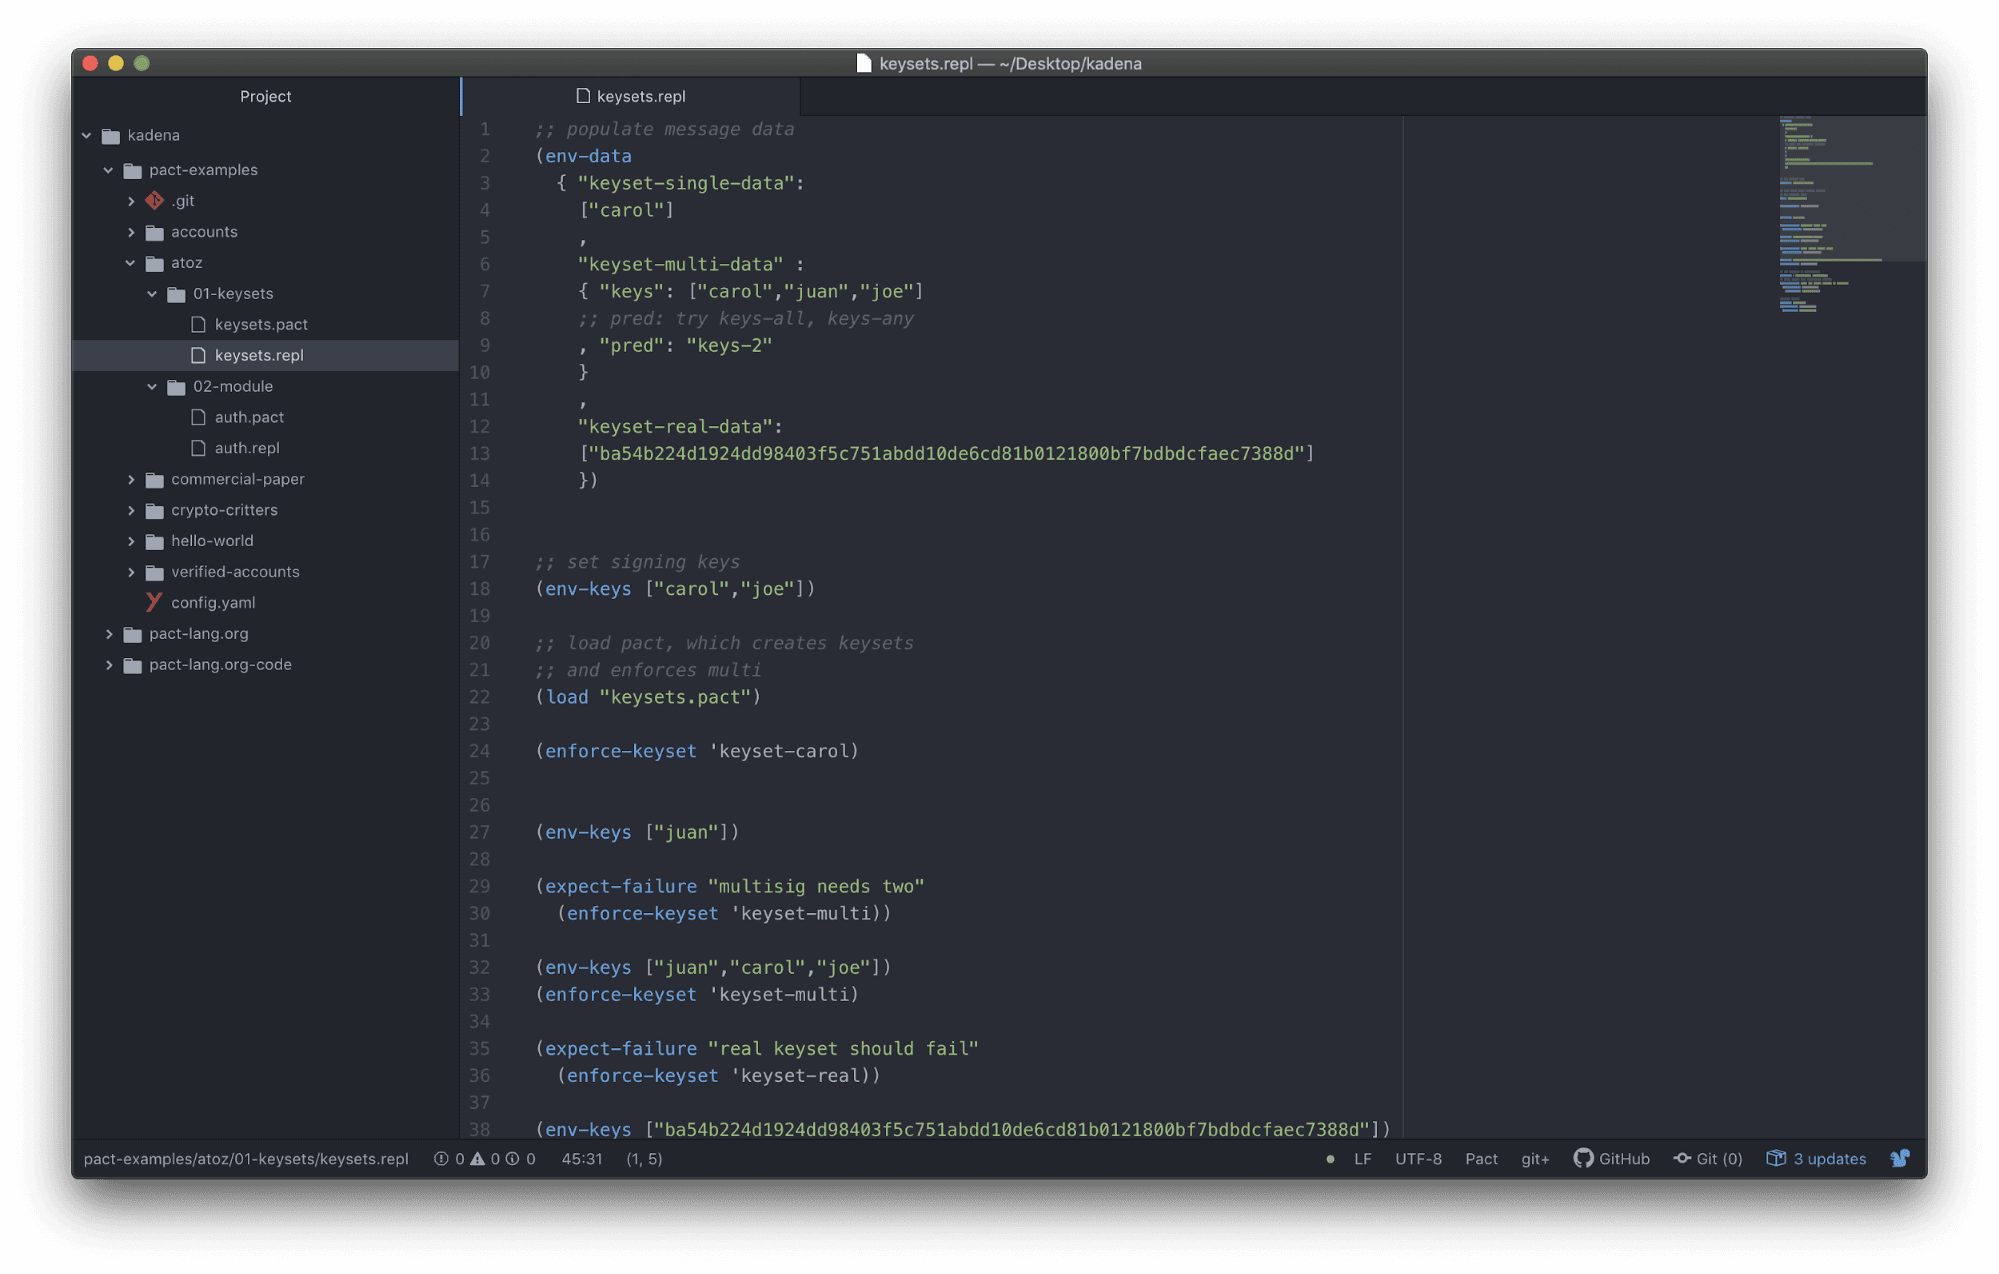
In this file you will notice the use of a new built-in function named expect-failure. Both expect-failure and expect allow you to test if the outcome of an expression is what you would have expected.
| expect | Evaluate expression and verify that it equals what is expected. |
| expect-failure | Evaluates the expression and succeed only if it throws an error. |
On line 35, notice the line that states that it expects the real-keyset should fail.
(expect-failure "real keyset should fail" (enforce-keyset 'keyset-real))(expect-failure "real keyset should fail" (enforce-keyset 'keyset-real))You can tell that this test is passing because there is no error message or highlighting.
To make this test fail, try changing keyset-real to keyset-carol.
(expect-failure "real keyset should fail" (enforce-keyset 'keyset-carol))(expect-failure "real keyset should fail" (enforce-keyset 'keyset-carol))After making this change, the filename keysets.repl should now have a red squiggle under it and line 35 should have a red dot next to it. Both of these indicate that a test is failing within the REPL file.
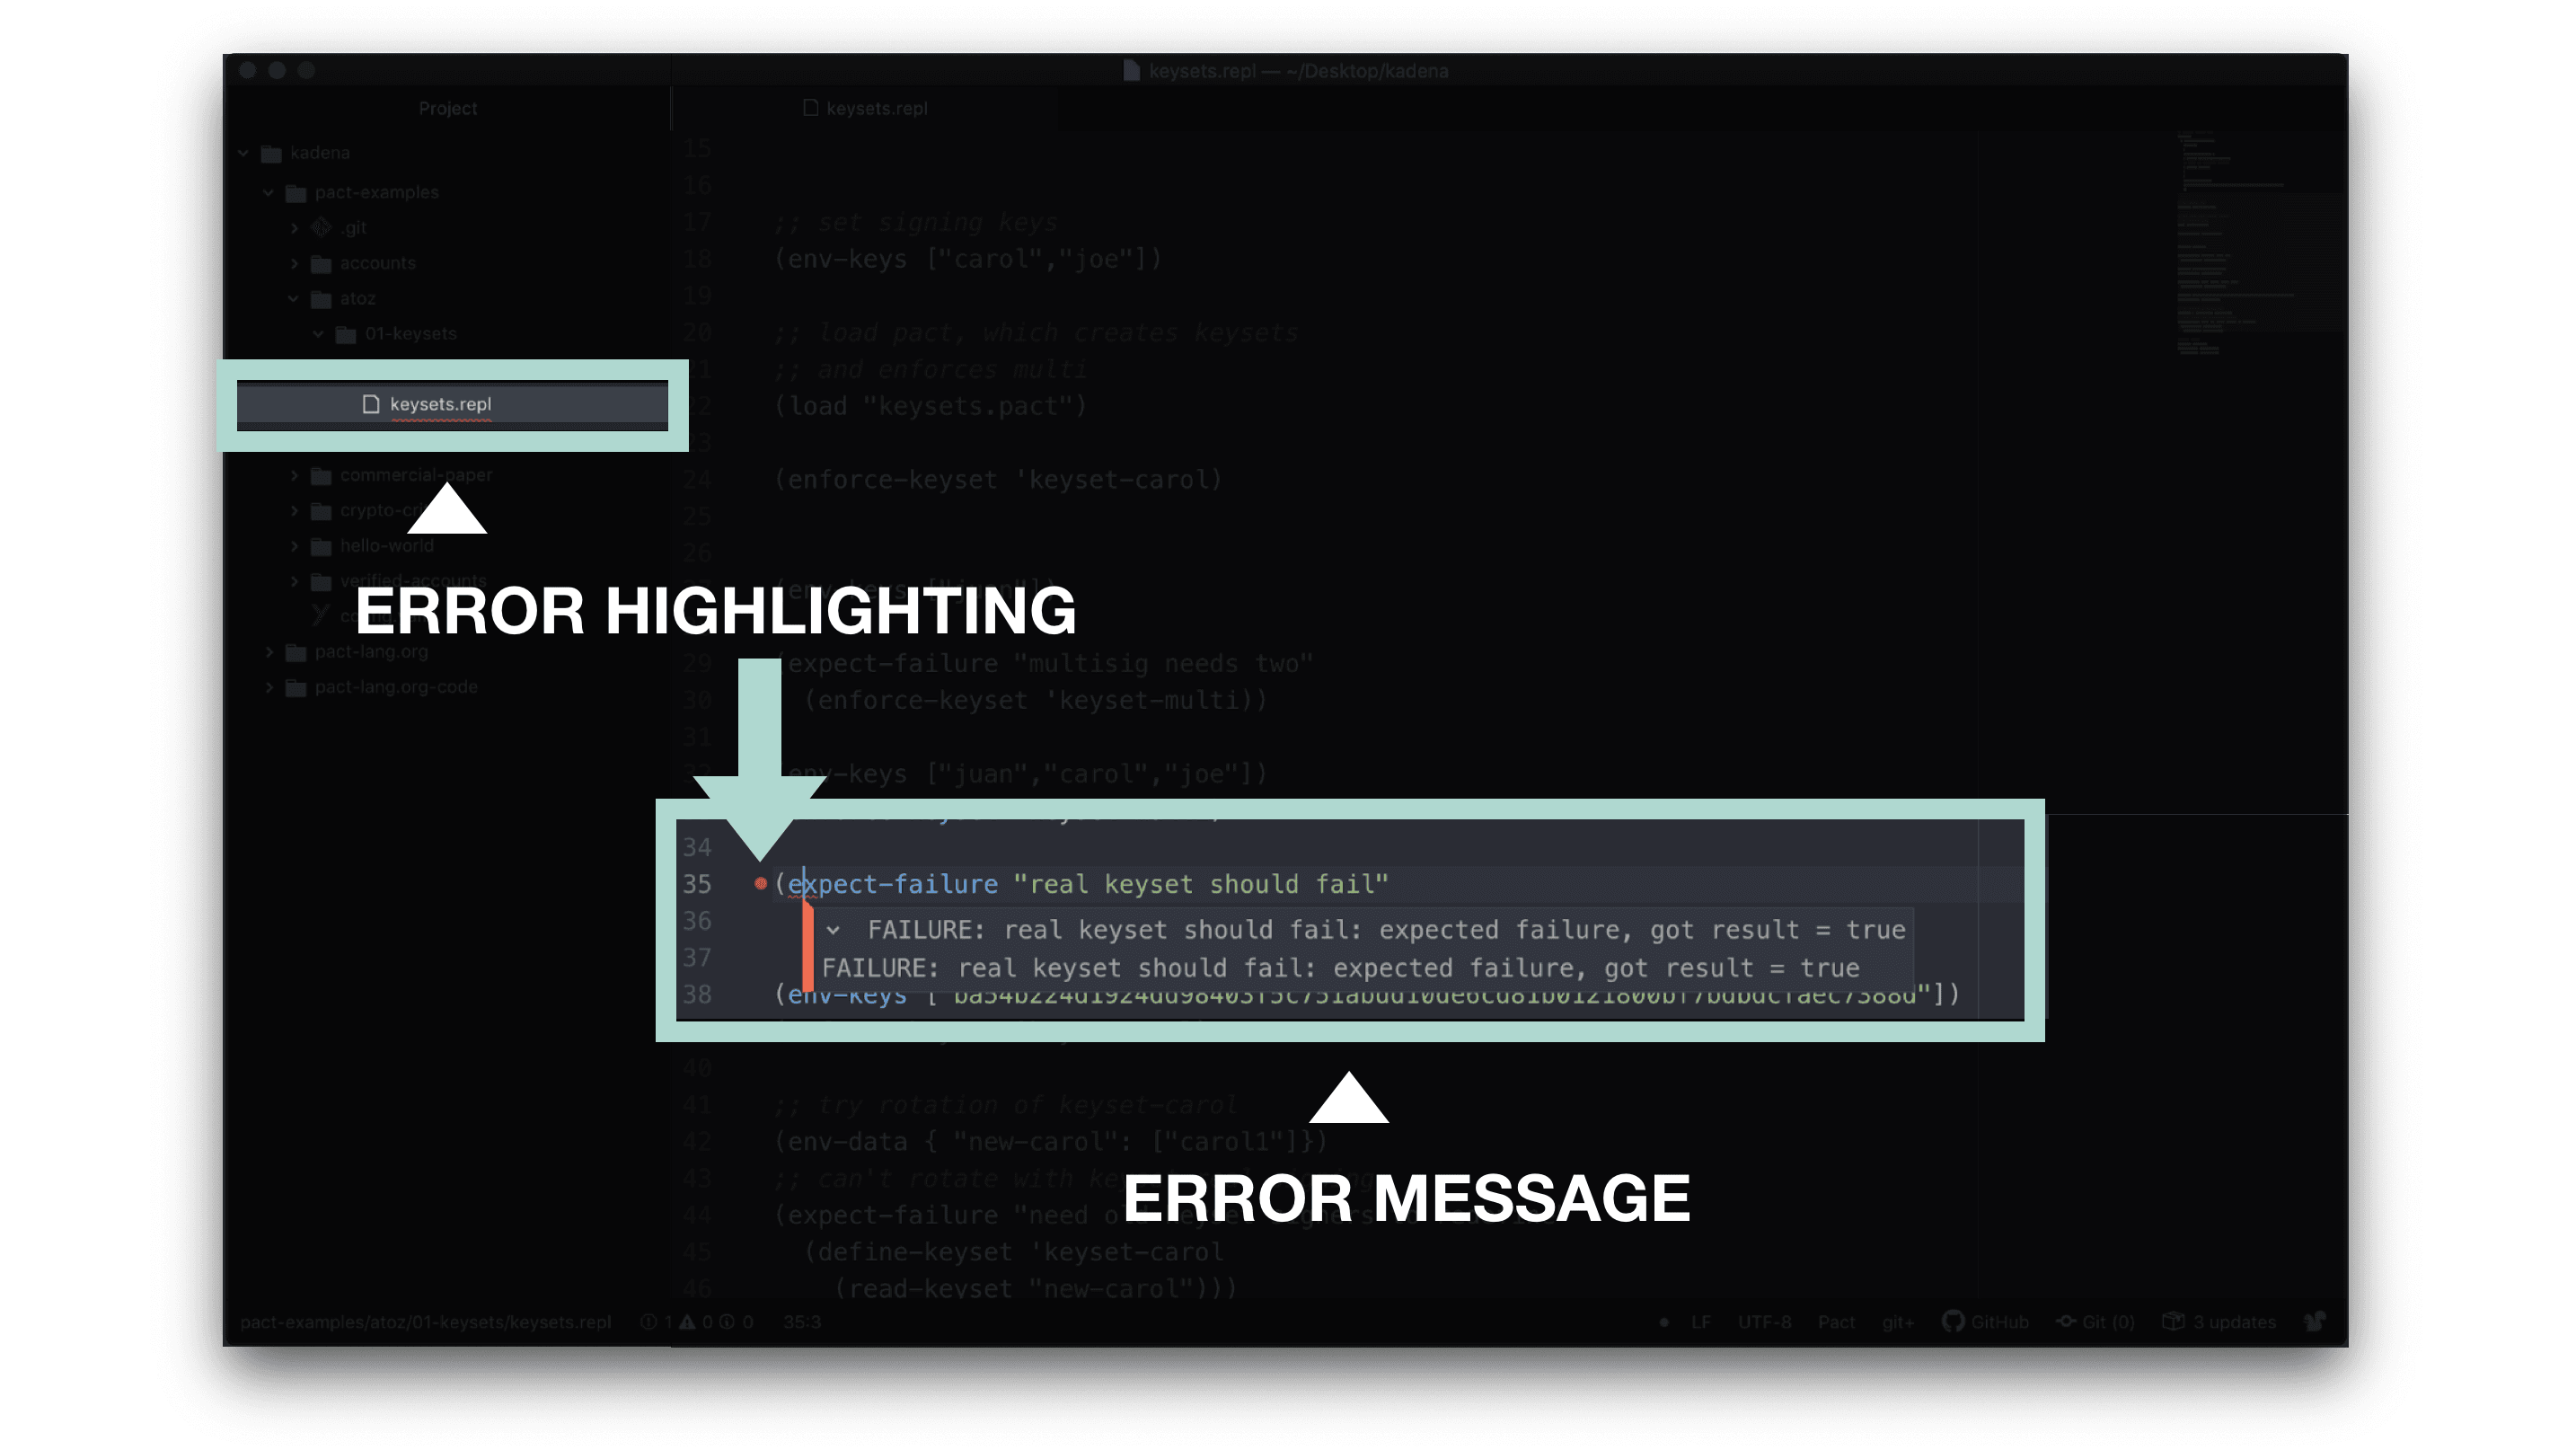
To get more information, you can click the dot on line 35 and select the triangle to view the source of the error as shown below. Using this detailed information you can better test and debug the code from within your Pact smart contract.
To understand exactly what is failing and why, it helps to look through both the .pact and .repl files for more information. Take some time now to study the keyset example files as well as a few other examples to practice testing code and debugging errors.
Review
Congratulations on completing this introduction to Testing Pact Code in the SDK!
In this tutorial, you learned both the basics of testing in the SDK and how to build your own REPL file. This is a great start to begin testing the smart contracts you build locally. From here, you can experiment with changing the .repl or .pact files to see how this changes the output in your terminal.
Using this workflow, you can begin building and testing files however you would like.